Estate Sale Fix

I heart estate sales.  Have I ever mentioned that before? (only a few times I'm sure).  Seriously, though it borders on unhealthy.  Do most normal people spend their spring/summer mornings getting up as early as they do on week days just to dig through other people's junk?  I blame my parents. I dragged myself a few towns away on Saturday morning because I was craving a treasure hunting fix and the ad looked promising.  This estate sale did NOT disappoint.  Even though they only had 3 rooms with stuff for sale (it's so much more fun when you have a house of treasures to explore), but those 3 rooms were chock full of piles and piles and piles of art, both framed and unframed, and vintage books.  Lucky for me, art is one of the few things I can collect without Hubby rolling his eyes.  For some reason he's not too keen on the rescued furniture piles I've started hoarding in the basement...

Like I already mentioned, I didn't leave disappointed.  Quite the opposite actually.  I left this sale with 2 pieces of art that I've been coveting for almost a year.

Flash back to almost a year ago and Nichole from Parlour Home Blog posted a picture of her shop.  The particular picture that made me swoon featured 2 vintage botanical prints.

theshop12

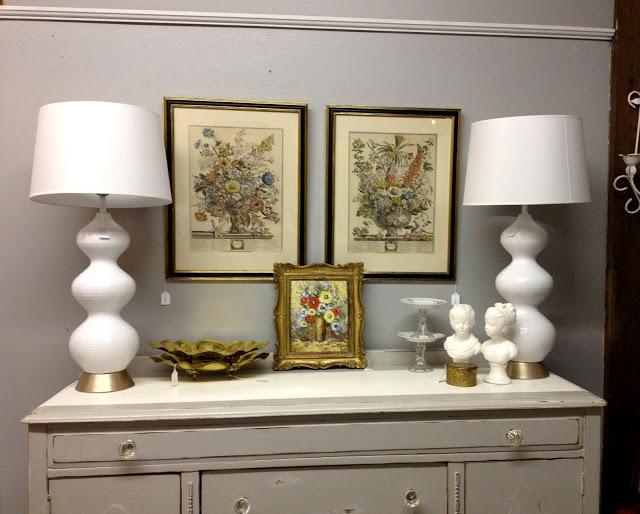
I immediately e-mailed her to see if she did online sales or shipped, but the answer was no.  sadface.  After a bit of research, I discovered that these were vintage reproductions from a catalog of flowers, Twelve Months of Flowers by Robert Furber originally printed in 1730.  and. I. wanted. them.  They have new reproductions available on allposters.com and similar sites, but where's the fun in new?

Guess what I found at the estate sale?

furber prints

$20 bucks a pop.  They had a lot of them at the estate sale, a few duplicates, but not all the months.  They're obviously reproductions, but I'd be shocked if they weren't at least 30 years old.  I must have poked through them for a good 20 minutes deciding which ones I needed (yes, needed).  I settled on only 2 since our house is small and there's only so many florals I can push on Hubby.  I ended up with April and October since they had the most vibrant colors and let's face it- April IS the best month of the year.  The weather gets nicer, it's warmer, the days are longer, and it all leads up to my birthday on the 30th.  It's not that I'm fixated on birthdays, but April just gives me the warm and fuzzies.

So do these prints:

April floral print

October floral print

I plan on getting bright new mats and painting the frames a pop color to modernize them (Hubby calls them "old lady" but appreciates that I like them.)

I also bought an unframed print of Brugge  ($5!) for the Hubs to soften the floral blow.

brouge print

I adore the colors, but the swan is by far my favorite element.

Now I just have to find a place for all my new art!

Clark: Week 8

If you’re new to my weekly progress posts, Clark is my first ever flip house (named for the street that he’s on).  Check out my previous posts here. Ak, week 8 already??  Our goal is to get this guy listed by the end of the month! That means I only have about 2 more weeks to get everything done... Craziness!!  I see lots of overtime in my future.

This week didn't start off on a high note- slamming your finger in the car door first thing Monday morning isn't the best start.  Luckily my finger escaped (once I unlocked the door) with just some scrapes and bruises- nothing too serious... and thankfully, the week improved from there.  Handy Dad helped me unclog the plumbing vent stack, which will finally allow the pedestal sink to drain properly and not clog!  I won't go over the entire 'scientific' process with you, but it involved Handy Dad on the roof with a really big stick from the yard tied to a rope (Oh how I WISH I had gotten a picture of this!).  It may have been unconventional, but it worked!

The biggest (literally) thing that happened this week was a new roof!!

w8 roof3

w8 roof2

The roof wasn't in horrible condition, but it did need repair.  After talking to several people, I bit the bullet and decided to put in a whole new roof.  New roof = selling feature!

w8 roof1

As you can probably also see, he got a exfoliated a bit more too.  The house painter finished pressure washing and scraping.

Back inside, little things are starting to make a difference.

w3 kitchen lights

For the first time since owning this house, there is a light above the sink (or where the sink will be).  I still love this ReStore figure- $5 plus spray paint and a chain!!  I do have to change out some lightbulbs, though.  I've been working with the bulbs that were left with the house, but I think every light is a different color variation.  Not kosher to this OCD designer.

I also cut, routed the edges, and painted the wood piece for the kitchen ledge.  I needs another quick coat on top, then I need to actually install it permanently.

w8 kitchen ledge

Painting is finally complete in the kitchen and hallway!  It's such a breath of fresh air- something looks complete!

w8 kitchen hall

Satisfaction is a completely checked off To-Do list.  It may be just for the hallway, but I'll take it!

w8 hall checklist

I had it in the schedule that the bathroom would be near complete with working plumbing fixtures again.  The schedule lied.  Either that or I'm slow and was a little too optimistic when setting my schedule.

But if we look from the hall, we can pretend it's done.

w8 hall bathroom

Just don't look further in- reality rears it ugly head and you can tell the bathroom still isn't there yet. I started installing the beadboard, but I have to finalize the sink plumbing before I cover that up.  Do you notice the other new item in here?  New sconces!  The school-house style plays off the other lights I've installed in the house and helps add a bit of character back in.

w8 bathroom1

I had to replace some really bad "previous owner DIY solutions" for the pedestal sink.  I need to put the sink in place and cut the pipe coming out of the wall to the correct size before I do the final install of that, but I plan to get it up and running today.

w8 bathroom plumbing

Speaking of plumbing, I've apparently turned into a toilet hoarder (I guess it's just a branch off my chair hoarder habits).  The previous toilet (in the back) had a scallop on the top that I just didn't think would work with the style I was going for.  Luckily toilets are cheap and for under $100 I got this clean new eco-friendly dual flush guy.  Let's get him in already!

w8 toilets

I've also made attempt at getting back to organized.  I started sorting recycling in the basement.  My town has a recycling drop off center and will happily take my car-full of cardboard and styrofoam.  I like free, environmentally responsible disposal methods.

w8 recycle pile

And since I always try to keep it real and honest here:  Sometime the answer to "why is the furnace not working?" is as simple as an empty oil tank.  Go me.

w8 oil tank

This week, I also:

  • Got the new medicine cabinet and bathroom vent fan
  • Ordered the kitchen faucet
  • Installed a new handle, closer, and wind chain on the side door (I still need to try and knock it back level though)
  • Figured out new handles for the shower faucet (I think)
  • Started figuring out my landscaping plans

Next week is going to be HUGE for my dear Clark.  I WILL have the bathroom working again by Monday- I WILL.  Monday he's getting sexy granite countertops and Tuesday, the horrendous lumpy driveway is being uprooted for a smooth new driveway.  Hello curb appeal!  Well, I guess the real curb appeal will happen once he gets painted- just waiting on a stretch of nice, cooperative weather.

If we want to get him listed in less than 3 weeks, I need to make every second count!

Let's Talk Tile

I'm not sure I fully expressed to you how excited I am about the bathroom floor tile.  It's admittedly not perfect, but hubba hubba. tile closeup

So let's talk process.  This was my first time tiling, so it was definitely a learning experience.

The tools I used were:

  • tile (naturally)
  • tile nippers (for cuts)
  • thinset mortar
  • a drill with a mixing bit
  • a bucket
  • notched trowel
  • margin trowel (smaller for getting into corners)
  • tile spacers
  • grout float
  • grout
  • sponge

After getting the sink and toilet out of the way, I laid out all the tile to dry-fit it.  This is the best way to figure out where you'll need cuts and how the puzzle will all fit together.

tile dryfit

Looks almost like a finished product except nothing is secured into place.  I took this time to start making ALL my cuts.  Since my tiles are small and almost all my edges will be covered (by wainscoting at 3 walls and caulk at the tub), I used tile nippers.

tile_nippers1

You can probably see in the pic of the floor above, just how many little snips I had to do.  I lost count of how many little black tiles I snipped in half.  Let me tell you, though, these things are secretly dangerous.  Every tile you nip sends tiny shards everywhere.  Not only did I make quite a mess, but I ended up with what looked like paper cuts all over my hands.  I'm willing to bleed a little if it means pretty tile like this, though.  I did take a run to Lowes and have them cut (for free!)  the tile that I needed at the threshold since that would be much more exposed and visible.

Then, as Ted would say on What Not to Wear, I mixed up the magic.  After a bit of internet research, I found that thinset mortar should ideally be somewhere near the consistency of peanut butter or mayonnaise.

mortar mixing

Once you spread it out like below, you then go back over it with your notched trowel.

floor mortar

The first corner, so exciting! (see the notches from the trowel?)  My tile's were mounted on 1 foot x 1 foot sheets, so I only needed to use spaces between the sheets.

first tiles

It went rather quickly once I got the hang of spreading the thinset.

tile half way

It did inevitably escape through several of my grout joints, but luckily there's a simple solution for that.

escaping mortar

Once the thinset is dry, you can go back with a utility knife and scrape down any areas of thinset run-aways.  You don't need to scrape it all away, just low enough to allow for gout over it.

When I got to the transition, however, I had an issue.  My tile installation had migrated just enough towards the doorway that the cuts I had gotten at Lowe's no longer fit.  Luckily it's only a few minutes away, so I quickly measured the cuts that I NOW needed and ran out to Lowe's so I could get the last few cuts and install the pieces before the mortar I had mixed dried.

tile transition

After I got back and installed the last few tiles at the door, I noticed another issue.  See the 2 tile's popping in the middle?

tile pop closeup

I removed the trouble-causing spacers, pressed down the 2 rogue tiles and hoped they would adhere into place.  Only one did.  When I came back to check on them the next day, the little black tile was free.  I scraped the thinset from below it and mixed up about a spoon-full of new thinset to reset the little guy.

missing tile

After giving him some time to dry, I removed all my spacers and got to grouting.

tile spacers

In my eagerness to grout, guess who forgot to take pictures?  This girl!  It's not too visual of a process though.  Step 1: Spread mud all over your pretty new tile.  Step 2: Use sponge to clean it off.  Step 3: Let it dry.

Then you get a pretty finished floor like this one.

w7 bathroom floor