Millie: Week 10

I hope you enjoy these weekly updates as I learn to navigate through the business of flipping houses.  This flip, Millie is the most challenging and most exciting yet! You can find more about this house and about my 3 previous flip houses here. After 10 long weeks, the exterior of the house is almost done!  If we just look out here, I can pretend the whole house is almost done!  I'm throwing a lot of before pics into this post because they really show how far this house has come.

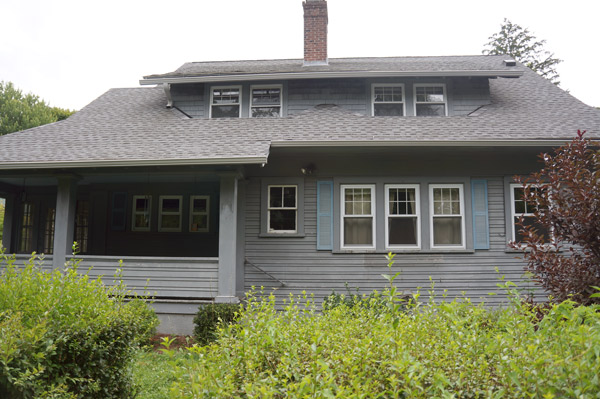
When we bought her, Millie was an overgrown gray box, remember?

Millie-exterior

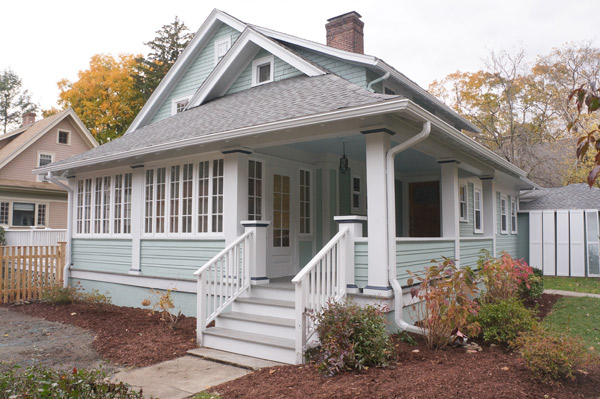
Aside from a few minor touch ups, painting is done!

Millie week 10 painted house front via Year of Serendipity

As I mentioned a few weeks ago, as I uncovered the house from the weeds, I realized that the side was intended to be the curb-appealed front, so I treated it as such.  You never would have known before-

Millie-Ext-1

but this was hiding underneath.  Wow I took out a lot of trees/bushes.  Now I just need the grass to grow there! (The painters also painted my yet-to-be-installed new garage door as you can see leaning on the garage)

Millie week 10 painted house curb appeal via Year of Serendipity

I'm ridiculously happy with the new fence that my contractor installed on this side.  The old fence spanned the length of the yard,returned to the front porch stairs and was about to fall down.

millie-before-old-fence

The new fence extends only to the end of the back deck, letting the sun room and front porch become the 'front'.  And it's pretty.  And has a gate so you can actually get a lawn mower to the back yard.  What a novelty!

Millie week 10 craftsman fence via Year of Serendipity

If you haven't noticed in the front yard pics, new mulch has been spread throughout the entire yard.  66 bags to be precise, and my back is tired.  BUT the result is so worth it.  I apparently don't have any pics of this view of the back yard before we started attacking weeds, but even from this week 2 progress pic

Millie-w2-back-yard

there's a little bit of a change.  Looking a little less jungle-like in my opinion

Millie week 10 back yard transformation

And just for effect, let's look at the side yard again.  The side yard was wholly unusable due to weeds before.

Millie-Ext-13

It's almost hard to believe that the overgrown holly at the corner of the deck above is the same nicely groomed one below.  Not pulling your leg, I swear.

Millie week 10 side yard

The other side of the house, or the lanai as I like to call it

Millie-Ext-11

also got some new fencing (to replace rotten fencing) and more mulch, but nothing drastic.

millie week 10 lanai

Traveling inside, I was destructive once again.  In the kitchen, I pulled up the top layer of linoleum and it's accompanying plywood and started to remove about 5 kagillion staples.  I know it doesn't look like much since there are still 3- THREE!!- layers of vinyl tile that still need to go away to reveal my hardwoods underneath.

Millie week 10 kitchen floor

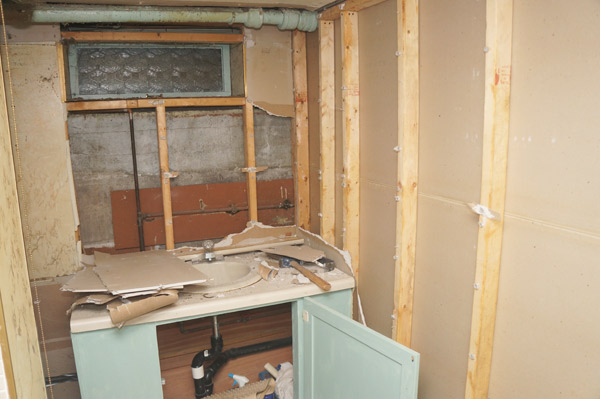
And in the anticipation of my plumber getting started next week, I smashed more- this time in the icky basement bathroom.

millie week 10 basement bathroom

But since the outside is far and away the prettier view currently, I'll leave you off with that view.

Millie week 10 curb appeal via Year of Serendipity

Still left on the exterior is fence completion on the lanai side, trim and door repair on the garage, exterior lights, growing grass (or sodding, we'll see), fixing one broken pane of glass, replacing door knobs/locks/deadbolts, repairing the front door, installing a screen door on the back door, and adding house numbers.  Seems like nothing compared to how far she's come already!!

Happy Halloween and have a great weekend!!

Make it Work: Thrifted Art

In the series, Make it Work , I show you how to take a seemingly random thrifted find and hypothetically 'make it work' in an awesome space.  WWTGD (What would Tim Gunn do?) On to today's Make it Work!

I've been scouring Craigslist a lot lately.  I mean a lot even for me (and that's an awful lot for most people).  Aside from a few things that will probably work for eventually staging Millie, I haven't been coming across any total gems.  Sometimes not being WOWed by a piece gives you the opportunity to add the WOW yourself, however.

I present to you: dated 70's hot air balloons currently on sale on our local craigslist for $20

CL hot air balloon art

I'm betting about 87% of you are questioning my vision right now.  Am I in the midst of a stroke?  Losing my eye sight?  Nope, I truly think these stuck-in-time pictures have potential.  With some modifications.  Something about the hot air balloons draws me to them.  Something about the current color scheme and the frame scares me away.

First, I'd start off by correcting the hideousness that's scaring me.  Paint the mat white and use a gold rub-and-buff on the frame.  Now the only color issues reside in the paintings/prints themselves.  My solution for this?  Dip it!

asn2505140057_1

image credit: insidecloset.com

In reality, the process would be less of a 'dip' and more of a 'tape off half the painting then use a brush or spray paint' but the effect is still the same.  Our previously questionably hot air balloons would suddenly look ethereal and modern.  Here is my not-so-perfect photoshop rendition to give you an idea of what the balloons would look like.  Picture the frames shinier and the paint wouldn't look so flat.

photoshopped-CL-hot-air-balloon-art

You could also take it one step further and stencil or paint on a favorite quote or phrase.  I like the idea of a tone-on-tone.

photoshop-overlay-hot-air-balloon-art via year of serendipity

Now what's one to do with this bizarre revived art set?

Personally, I think it would make the perfect statement over the sofa.  Large enough to fill the space, the new paint gives it a night weight, and it demands attention without screaming for it.

Make it Work: dipped art room vignette via year of serendipity

side table: target/frames: target/sofa: mitchell gold + bob williams/pillow: caitlin willson textiles/lamp: ikea

I know the dipped look isn't one to please everyone's tastes, but it's a great way to make a statement on a budget.

Are you on board or do you think it still looks like junk?  I'd love for you to weigh in!


A Stitch of Truth

Did you happen to catch a glimpse of my humble abode on Apartment Therapy's House Call on Saturday?  If you were busy making the most of your weekend, go check it out now! With colder weather peeking in lately, my knitting needles have come out once again.  For some reason I only knit on airplanes or in cold weather.  Well, after making hats for all my boys last Christmas (Hubby, Handy Dad, my nephew Eli, and his daddy Eric), I needed to spread the knitting love and make a hat to keep my cheeky new niece warm this winter.  I fell in love with this pattern on Ravelry.com and jumped in needles first, hoping that my hat ended up half as cute as the one on the pattern's adorable little model here.

ravelry-baby-turban-pattern

The knitting gods have other plans, I guess.

knit-fail

I SWEAR I followed this pattern to the T.  Clearly I'm not quitting my day job.  I was debating whether to share with you my knitting debacles, but I clearly decided to.  Often times DIY blogs are all styled, amazing projects and rooms and rarely do you see the dozens of false starts it took to achieve the perfect end results that you avidly pin.  Keepin' it real here as always.

My first, half completed attempt was scrapped mid-way because I thought the proportions looked off.  After assuring myself that the pattern had good reviews and that I should see it to the end, I gave it another go.  Aside from using a smaller needle to make the hat smaller than my first attempt(and apparently too small) this just ended up looking ridiculous.  Sometimes I will, admittedly, follow a pattern blindly, even if it doesn't looking right yet, because sometimes the textile reveals itself as you get in further.  This was not the case.  The only thing that revealed itself as I went further was a conehead and my dear Lyla did not deserve that.

I have started more than a half dozen hats in the past few weeks(this pattern and one other), the majority of which have found themselves in the trash, and my baby niece is still hatless.

knit-hat-false-starts

The most common issue I've had has been knitter error.  Since I'm a weeee bit OCD here, if I can't easily rewind to undo my stitch errors, I scrap it and start over.  Several times.  I stopped counting.  I'm also blaming the patterns for my inability to follow them properly.  Don't they know they need to SIMPLIFY so I can follow??

After my epic conehead failure, however, I think I know how to modify the pattern to actually be able to knit the desired result-  Less repeats and decreasing more gradually.

knitting-hat-take-million

No more blindly following the pattern.... I WILL make this one work!  (or give myself blisters trying)

Did you have any DIY misfires or successes this weekend?