A Step Above

So it's Wednesday already, huh?  I know I promised no kitchen post today, so I'll just say one quick thing- a 1 day install has turned into a 3+ day install (we will need to wait for a filler piece that was ordered wrong for it to be completed), BUT it will be a usable kitchen once again by the end of the day!  I can live without an installed vent hood and cabinet for a few weeks, as long as I can use the kitchen. (AND that'll give me plenty of time to plan out my TILE backsplash that I decided to go with!!) Much to the kittens and Hubby's dismay (who for some strange reason don't enjoy living in construction zones and project explosions) I've been taking this opportunity between flips to tackle projects around this casa that have been put off/avoided for years.  Some have been easy(ish) fixes (like painting/staining the porch), and others are not so easy (can we say kitchen?), but I think my next one fits squarely in the "easy fix" category.

Stairs-before1

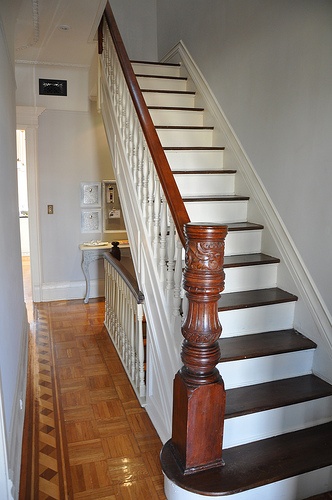
The stairs.  Oh the stairs.  This house is over 100 years old, but you'd never know when looking at the stairs since the railing looks builder-basic and straight out of 1998.  Since I'd like to channel a more 1908 vibe, this needs to change.  Pronto.  The first thing that will change is the horrific, ugly, dirty, dirt sucker of a carpet.  Can you feel the love?

stair-carpet-before1

I've vowed not to touch it until the kitchen is all done, but after that, ALL bets are off.  This suckers going down!  Do you like the cat scratcher decor in the first image?  (there's more at the top of the stairs too)  Yeah, that's to try and get Charlie to maybe NOT scratch the carpet on the stairs (to no avail) so that's one more big (fat cat) reason the carpet needs to go away.

Once the carpet lands itself squarely in the trash, the risers and spindles will get a coat of fresh white paint and the railing and newel post will get stained a more timeless shade darker.  Much like this staircase from Brooklyn Limestone (ya know, with the exception of the amazing floors and vintage newel post, but you get the idea).

brooklyn limestone stairs

As always, my To-Do list is about 5 miles long, so maybe I should focus on finishing projects before I move on to the next... but daydreaming about DIY is one of my favorite pastimes!

Who's with me?


Cabinets!

DSC04329.jpg

So this is totally happening as we speak. cabinet-install

I'm not giddy or anything though.  Not at all.  I enjoyed not having a kitchen or dining room for 2 weeks.  Enjoyed like one might enjoy a root canal or a termites.

Now that the cabinets are finally a reality, I'm starting to consider the backsplash.  I wasn't planning on doing anything about a backsplash since we already have a 4" silestone backsplash.  Here's a reminder of the counter we are reinstalling:

kitchen before

But I can't get subway tile out of my head.  A bit generic, I know, but add dark grout and you have a feature that honors the age of the house (113+).  Something like this drool-worthy space (via Lingered Upon):

subway tile kitchen via Lingered Upon

BUT adding tile into the kitchen would add extra cost, so that's where the debate comes in.  Do I reinstall the countertop and backsplash as is, and maybe add tile on top at a later date, or have them just reinstall the countertop but not the backsplash and convince Hubby that tile's the way to go?  Such decisions!!

Don't worry, Wednesday I'll have a non-kitchen related post and hopefully post a reveal of the kitchen work on Friday.  Until then, what's your backsplash vote?  Tile, solid surface or both?

Sparkle in the Kitchen

This week, I've thrown my multi-tasking skills to the wayside and have eating, sleeping, and breathing kitchen prep.  Seriously, I've been dreaming about this kitchen.  Great for progress, but not so great for blog content.  I was scrambling to the finish line- or so I though.  The cabinet install was supposed to be happening as I type this, but at the end of the day yesterday, it got pushed back to Monday <pout>. The good news is that in scrambling to get stuff done, I got all the dirty work accomplished- trim, ceiling, walls are all painted, new light fixtures are installed (including relocating one), floor is patched (the depth difference of the base of the old cabinets vs. the new), and all the appliances are unhooked.  I'm holding on to the little wins right now- if you ignore the boxes on the floor and the exposed vent duct, the room is starting to look pretty snazzy!  I'm so pleased with the light fixtures!

Kitchen-light1

kitchen-pendant

The sexy pendant from Lowe's inspired the lighting.  Before finding this one, I had been looking at comparable lights online with prices from $150 and up.  When I found this guy for $48 it was a no brainer.  I found the other light on Amazon in the same finish and it fits perfectly in the space!

Now, all I have left to do before install is to clean up from my projects, throw down some paper to protect the floor, and start to shop for accessories.  Ok, so maybe the "shop for accessories" part doesn't need to happen before the install, but it's definitely helping to keep me sane through the chaos.

The polished chrome light fixtures will unintentionally match the cabinet hardware, so I'm eager to mix in some other metals.  Who knows what I'll end up getting, but here are just a few of the things that have been catching my eye.

kitchen-goodies

Kitchen goodies 1/2/3/4/5/6

Maybe if I'm stealth about it, I can sneak my vintage owl cookie jar into the decor without hubby noticing.  Think I can pull it off?