Christmas Break

Just popping in today to say "Hi" and let you know I'll be taking a short posting break this week.  I'll be back on Friday with just a quicky Millie post then back to the usual next week.  Until then, please enjoy this picture of Daisy from a few Christmases ago. daisy-tree

If you celebrate Christmas, I hope it's wonderful!  Even if you don't, have a wonderful week anyway!

XO~ Karen

Millie: Week 17

I hope you enjoy these weekly updates as I learn to navigate through the business of flipping houses.  This flip, Millie is the most challenging and most exciting yet! You can find more about this house and about my 3 previous flip houses here. I've waited 17 weeks to get here, but I'm finally at the place where things are falling into line and I'm getting re-energized to Git-r-done!

I spent a large part of my week in the smallest room of the house, but its been totally worth it.

w17-bathroom-1

So, admittedly, the contractors did the walls, and I did the floor.  I didn't want to take the time to do both (if I did everything myself here, the job would never be done) and the floor was more time consuming (aka saving me more money) so I opted to do that myself.  Plus it's fun staring at marble hexagon tiles for a week.  Seriously, they're pretty.  I should also mention on the back wall- since the angled wall was so unlevel, it's actually going to look better if we level the wall to match the tile line as opposed to cut all those tiles at crazy angles.  It's worse in person.

So, back to those floors

w17-bathroom-2

Every single tile is cut and laid (that's simultaneously the benefit and downfall of installing mosaics- lots and lots of tiny cuts).  I was planning to grout last night, but after a last minute trip to The Tile Shop to get a better grout color, I decided I probably should slow down and take the time to seal the tiles first and do this floor properly, not just fast.  As my first time working with marble tiles, I had forgotten the recommendations that if you seal them before you grout it helps prevent the tiles from getting hazy from the grout.  Now I'm glad my first grout try was too brown.

The walls got grouted with a light gray and will be getting a decorative trim piece on the top edge once I get the window trims back in.  The floor will also be getting a light gray grout.  It's my personal philosophy that while white floor grout looks super nice at first, you're ultimately setting yourself up for staining or endless bleaching.  Light gray looks super sexy with the tile AND hides more dirt.

w17-bathroom-3

I cannot wait to grout this puppy today!!

While my contractor was working on the walls, I tried to stay out of his way and work on patching some plaster in the bedrooms.

When last we visited the pink room there were 2 gaping holes in the walls from where the plaster was too far gone which I apparently never caught both on film.  Here's one.  Multiply that by 2.

w17-pink-walls-before

Now, in addition to being wallpaperless, the pink room is also free of gaping holes and has had all of it's plaster repaired.  Just a little more skim-coating to go, then lots of sanding.  If you look closely, you can see the rectangle patch in the middle of the wall since it was still drying when I took this pic.

w17-pink-walls

But clearly patching walls isn't as pretty as the bathroom, so.....

bathroom.

w17-bathroom-4

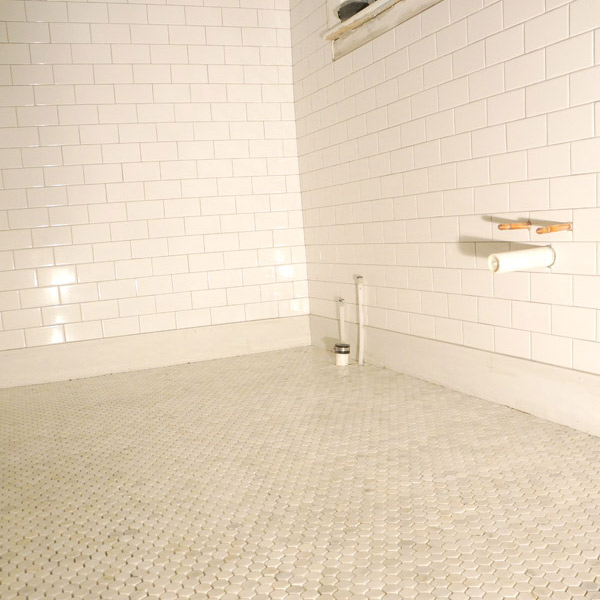
I was very focused this week, can you tell?  With the bathroom now crossing the 75% done mark, the upstairs is starting to feel like it could be done soon.  Putting things in perspective for me a bit- the upstairs alone is right around the size of the previous houses that I've done.  Crazy, right?

Although next week will be a short week work-wise due to some strange holiday, I'm anticipating having some pretty pictures to show next week as well.  Now's when my progress pictures start getting more exciting than "look, I demoed some plaster."

Have a wonderful weekend!


Holiday Roundup

52c64491697ab07e880163c5._w.1280_h.1280_s.fit_.jpeg

Can you believe Christmas is already a week away?  It's a stealthy little minx, huh?  I figured I'd pop in today with a rare Thursday post to make up for my lack of posting yesterday with a little bit of festive inspiration.  Lately I've been loving all of the holiday DIYs and home tours that I just had to share some of the highlights with you. **As per usual, please pin responsibly.  Please click through to the original sources to pin from.  Muchos gracias!!**

I was scrolling down my facebook feed the other day and was stopped dead by this adorable tree topper featured on an Apartment Therapy home tour.  It just goes to show that despite seemingly every tree in blog-land being curated and themed, you can still accomplish a chic, stylish tree with mis-matching and personal ornaments.  Whoooo knew?  (pun intended)

Apartment Therapy Organic Modern Home Tour

I'm absolutely in love with Nicole Balch's holiday mantle over at Making it Lovely.  What can I say, I'm a sucker for a good silver gold and white combo- much like my own tree.

Making it Lovely's Christmas Mantel

If you're in need of a super simple way to style up your holiday buffet, might I suggest popping over to Little Green Notebook where she created this stellar buffet backer (again with the puns).  What I love most about this idea is that you could bring the chalkboard backer out for the next event and draw a different backdrop.  Confetti for New Years, candles for a birthday, or even a beautiful hand written meal menu.  I think I may need to be making one of these in the future. (And hello, can we PLEASE swoon over her chevron floors and well styled bookcase)

Little Green Notebook Starry Holiday Buffet

I've never been hugely into the holiday pillows thing, thinking it was a little kitschy, but once again Madam Emily Henderson proved me wrong and killed it with her glam holiday decor this year.  Somehow she seems to always manage to create rooms that are simultaneously ready for a magazine cover and invite you to curl up and get comfy at the same time.  Not an easy feat.

Emily Henderson Glam Home Holiday Tour

I've never been the biggest fan of the standard wreath for indoor decor.  Luckily for me, lately anything in a roughly wreath-like shape can pass for festive and I'm loving the creative options!

These cut wood wreaths from Sarah M. Dorsey are so simple and pretty.  With different decorative elements added, these could almost last year-round on a front door.

Sarah M. Dorsey wood slice wreath

Along the same general shape lines, I've seen several versions of PVC pipe wreaths like this one from A Beautiful Mess and I love them all.  Maybe because it involves gold spraypaint.  I would probably like almost anything if you spray it gold.

A Beautiful Mess gold PVC pipe wreath

The most unexpected wreath, but so simply chic is this geometric floral wreath from Brittni at Paper n Stitch.  This one might convert me to being a wreath-year-round type of gal.

Paper n Stitch geometric floral wreath


Looking at all this awesome holiday festiveness is getting me in the mood to wrap presents!  How have you gotten in the holiday mood this season?