

Have you entered Monday's giveaway yet? Time is running out! With no flip still (trust, me, we're TRYING but this spring market is just too hot! I wish I was selling a house now!), I'm itching to break out the power tools. For some reason though other projects like planting and mulching the yard and cleaning out the basement for a well over due tag sale are taking precedent. Instead of a new project to add to my to do list, I thought today we could reminisce about an old one.
Still one of my favorite projects- and still in use- is my kitchen wall-mounted wine rack. Here's original post from back in 2013:
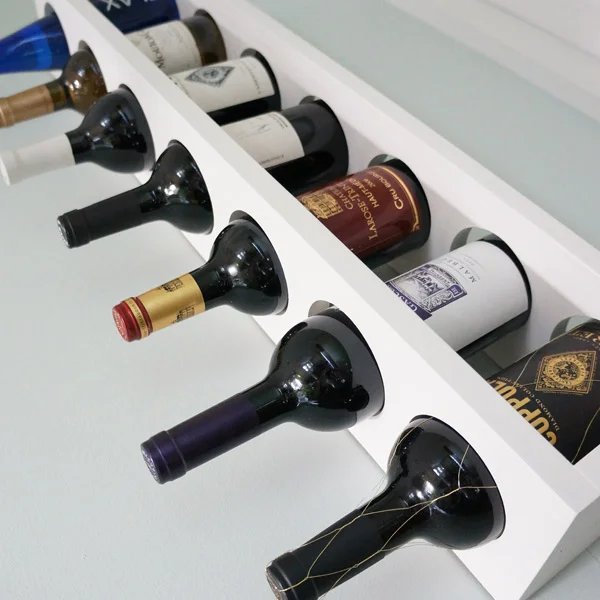
It's time for some wine!

We've had a severe lack of wine in this house lately, because we haven't had space for a wine rack. Hubby's been challenging me to make a custom wall-mounted one for months, so with the kitchen reno (hopefully) nearing an end, I realized this was the perfect time. (and who am I to say no when Hubby request a DIY)
It all started with a quick sketch when I was watching tv one night last week.

The dimensions got modified a bit as the project progressed, but this was a great place to start. I enlisted Handy Dad's help for another set of hands (and maybe for his tools as well... maybe).
The materials:
- 8' length of 1x6 poplar
- Kreg jig screws
- Wood glue
- Toggle screws (for mounting to the wall)
The tools we used:
- Chop saw
- Drill press (a regular drill could work too, but it would be a bit more work)
- 3 1/4" hole saw drill bit
- Clamps
- Kreg jig
The first step was to cut the boards to the desired length and mark out where my holes will go (this is where the dimensions got modified a bit).

Actually cutting the holes was the most difficult part. We clamped the 2 side boards together so that the holes would line up perfectly. To prevent as much splintering as possible, we drilled most of the way through one side, then completed the hole by drilling from the other side. Slow and steady...

This was my attempt to take a photo of all the pieces on a white background. #whitebalancefail

As you can see on the back pieces, I used my Kreg jig to drill pocket holes. My friend Kreg is awesome- it's a very simple drill guide and special bit that makes it super easy to strongly join 2 pieces of wood. I first read about it on Young House Love, and I quickly jumped on the Kreg bandwagon.
Next came assembly. Every joint got wood glued and clamped, and the back supports were screwed together with Kreg screws for extra support.

After assembly, I sanded the bejesus out of it, painted it with 2 coats of paint, and mounted it to my kitchen wall with toggle bolts (when all filled, the rack can weigh almost 30 pounds!)

So, what do you think? I think it fits perfectly in it's new home!
I originally had staggered the direction of the bottles, but Hubby and I both liked it a bit better this way.

I can't wait to reveal the whole kitchen to you- it's really becoming my favorite designed room in the house!
Back to 2016 now- this project has held up perfectly! Aside from a few scuffs from a rotating array of wine bottles being slid in and out, it still looks as good as the day it was built. Some other projects don't even last 3 months in this house let alone almost 3 years!
Have an awesome weekend!