Frankie: Week 16/Reveal pt 1!!

I hope you enjoy these weekly updates as I learn to navigate through the business of flipping houses.  Check out other posts about Frankie the Fliphouse HERE. Woo Hoo, the end is near!!!!  Frankie the Fliphouse will be 100% done in the next few days and LISTED on Monday!!

I was hoping to be able to show you the full reveal today, but the basement is still a thorn in my side.  A thorn that's very close to being done, but still isn't photoshoot ready.  Never fear, I'll give you part 2 of the reveal Monday with the basement's before and after (spoiler alert: I painted a lot!).

WARNING: long, picture filled post ahead.  Get your pin-finger ready!

I won't drag it out any further.... I present to you, the new and improved....  Frankie!!!

 Frankie exterior after

Admittedly, the exterior is not a HUGE transformation.  I basically cleaned it up and added a color pop on the door.  Remember what he looked like on day 1?

frankie1

A little fresher today, I think.

Frankie exterior closeup

The real transformation, however, is when you step inside.  Just inside the front door, you come upon the living room.  The once gross green living room.

frankie-livingroom-before

It's amazing what a bit of paint can do.

Frankie living room after 1

Frankie living room after 2

The most exciting transformation is what is just beyond the living room.

Frankie living room after 3

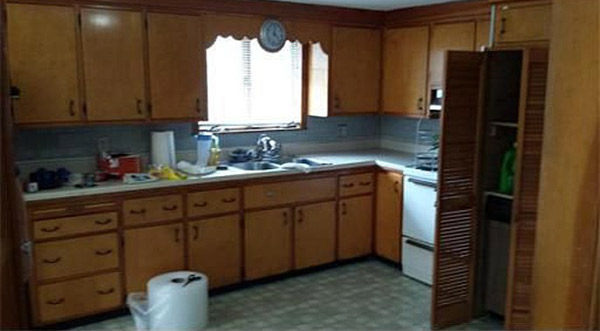
Once upon a time, the kitchen was grimey and practically non-functional.

frankie-kitchen-before1

frankie-kitchen-before2

This may be the first time I'll ever say this, but I think my before pics are too nice.  They don't truely convey the ick that was there before.  The photo from the listing does it a little more justice:

frankie-kitchen-before-listing

And now that you can really compare, it makes the end result all the better.

Frankie Flip House Kitchen After 1

Frankie Flip House Kitchen After 2

Frankie Flip House Kitchen After 5


Frankie Flip House Kitchen After 4

I raided my own house and Target's home section for some fun staging accessories.

Frankie Flip House Kitchen After 3

As we proceed down the hall, we find the first bedroom.  Thankfully it now looks larger an brighter than when we began.

frankie-bedroom1-before

Frankie bedroom 1 after

Across the hall is the other selling feature of this house... the bathroom.  What began as a dingy bathroom with a pink tub...

frankie-bathroom-before1

pink-tub

...is now a fresh space worthy of a new family's affection.

Frankie Flip House Bathroom After 1

Frankie Flip House Bathroom After 2

Personally, I'm jealous of the double sink.

Frankie Flip House Bathroom After 3

Between the kitchen and the bath, I'm hoping this house'll sell in no time!

Frankie Flip House Bathroom After 4

We can't forget, though, there are 2 more bedrooms.  They also didn't transform immensely, but boy, what a difference paint makes!

frankie-bedroom2-before

Frankie bedroom 2 after 1

Frankie bedroom 2 after 2

And last but not least:

frankie-bedroom3-before

Frankie bedroom 3 after 1

Frankie bedroom 3 after 2

And since I can't just leave you in the nice, bright, albeit not too exciting bedroom, I'll throw in a kitchen detail picture for fun.

Frankie Flip House Kitchen Detail

So, what do you think of Frankie's transformation??

Keep your fingers crossed that someone falls in love with him quickly!

Update:  Check out Part 2 of the reveal, the basement HERE

Inspired By

Between shoveling, moving buckets of concrete into a bagster, and rolling Drylok (paint as thick as frosting) on the basement walls, my arms are sure to look like Popeye's soon.  I'm not sure it's a look I'll be able to pull off, but it sure beats paying extra for a gym membership!  Even though I'm been physically hard at work getting this flip ready to list this weekend, my brain has been collecting inspiration and planning ideas for the next flip and for our own house! Here are some of my favorite inspirations from around the web that I've pinned recently.

This sweet table styled for valentines day by Carrie over at Dream Green DIY hits the right balance.  It's sweet and girly with a bit of vintage flare to keep it grounded.  I see those salt and pepper shakers everywhere... this table's making me think about picking them up next time they cross my path.

dream green valentine table

Every time I look at Dina from Honey and Fitz's bedroom I fall in love all over again with the reading lights.

honey and fitz bedroom

If you've read my blog for more than a week, you may have figured out that I've been fixated on gold lately.  It's no wonder that I'm enamored by this bathroom from Cuckoo 4 Design.  Gold... dots AND stripes... and still neutral enough to accessorize.... why, yes please!

gold white powder cuckoo 4 design

Since I REALLY need to get going on my basement work space if I plan to accomplish it for my 30 before 30 list, creative work spaces have been catching my eye.  This one from Be True Image Design is such a cute, family friendly space.

be true office

Last but certainly not least- you rarely see high chairs make an appearance in professionally styled and photographed dining rooms, but with a high chair like this, why not??  I don't think I can find a single thing with Jessica and Scott's eating nook (featured on Apartment Therapy) that I would change.  The mix of patterns and the light really bewitch me.

apt therapy breakfast nook

What's been inspiring you lately?

Chalk it up

ikea-hack-home.jpg

Back when I was at IKEA shopping for Frankie's kitchen a few months ago, I picked up this guy, the LUNS chalkboard, with staging in mind. ikea luns board

It's lacking a bit of personality, but for $15 I knew I could Tim Gunn it ("Make it work!")

In reality, as you can see from the pic below, the wood was very light- nice for some spaces, but clashed a bit with the wood cabinets in the kitchen where I planned to put it.

ikea board hack before

Luckily, light wood is problem easily remedied with a bit of stain, so I attacked it with Minwax Polyshades in Bombay Mahogany that I already had in my arsenal.

After one coat, it wasn't drastic, but added the richness needed to stand up against the reddish-brown cabinets.

ikea board hack stain

Stain alone wasn't enough to kick up the personality, so I painted the box below the chalkboard with the wall color and added a fun corner detail.

ikea board hack paint

The top corners each got 2 strategically places screws (for decoration only) and sprayed with a hammered silver spraypaint.

ikea board hack corners

After everything had dried and I pulled off the painters tape, I listened to the little IKEA cartoon man's assembly instructions, then proceeded to have fun playing with chalk.

welcome home wall

To help orient you, this little section of wall is in between the living room (left) and the kitchen (right).  I'm also making an attempt at not-so-subliminal messages for potential buyers.  I think it screams "BUY ME!!" but in a classy way.

ikea hack board welcome

Just a few small items left to stage and the upstairs will be ready for it's photo shoot!

DIY ikea hack welcome home

The basement, however is another story.  Another messy, neglected story that I need to hustle on this week.  Let's all keep our fingers crossed for no more snow days and an amazingly productive week!